Copying DVD's and Blu-ray's
Ever since I set up my HTPC/NAS I've been copying any new movies I buy to store on it so that I can stream them to my Roku or over the internet using Plex media server while away on vacation. I thought I'd go ahead and take a moment to talk about how I copy the movies in case it's useful to others.
There are two main programs I use when copying a movie. First is MakeMKV to copy the data from the disc to my hard drive. This program copies the raw video data, so it will require a lot of space.
The second piece is Handbrake which is used to encode the movies into a .mp4 file which also reduces their size considerably. Keen observes might notice that Handbrake has an option use a disc as it's source, so why not just use that? I've never tried it, so not sure how well it works. The primary reason I use a two-step process is so that I have the raw files already available in case something with the encoding does not work properly.
Another reason for the two-step process is that encoding a movie generally takes significantly longer than simply copying the data to a disk. By keeping the drive separate from the encoding process I continue copying movies to the hard disk while encoding previous copies.
Starting your own collection
So you want to start your own collection? Here's a quick guide to getting started. First, you'll need to download and install the necessary software.
- MakeMKV - This program will copy the raw decrypted video files to your hard drive. It works for both DVD and Blu-ray discs. It is currently available for free while in beta, though it does require you to update it every month or two to get a new trial. If you find it useful and wish to support its development, consider purchasing a license. With a license you can also avoid having to update it constantly.
- Handbrake - This program will encode your movies into the MP4 format. This format is more widely playable and also much smaller in file size than the MKV format.
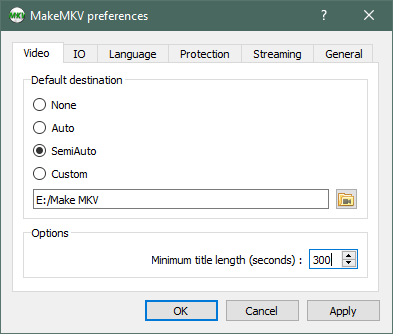
Once you have those installed, you'll likely want to change the default configuration a little. These are some minor tweaks that can help save a little time once you start the copying process. First, open MakeMKV then open the preferences dialog by selecting View -> Preferences from the menu. On the IO tab, change the default destination type to SemiAuto then select a directory to store the location. I created a Make MKV folder on a spare drive, but you can choose anywhere. You may also want to increase the Minimum title length setting to help filter out special feature titles and such. I find 240 seconds to be good, 300 would also work well. Everything else can be left as is.
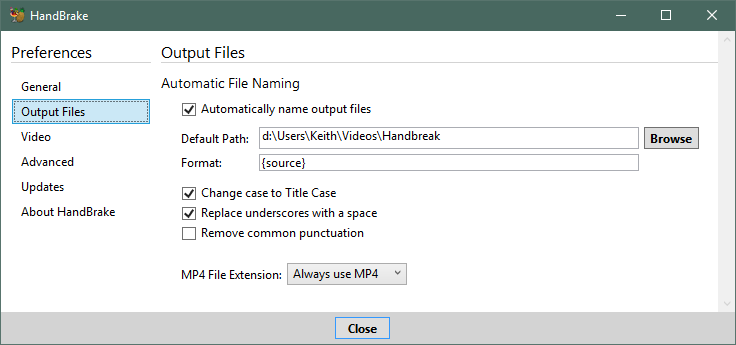
Next, open up Handbrake and open its settings dialog by selecting Tools -> Options from the menu. Switch to the Output Files preferences on the left and ensure Automatically name output files is selected. Choose the default output path to store the final videos and change the Format setting to just {source}. Also change the MP4 File Extension to Always use MP4 as I've found some devices or applications that do not work with the .m4v extension.
Copying the movie
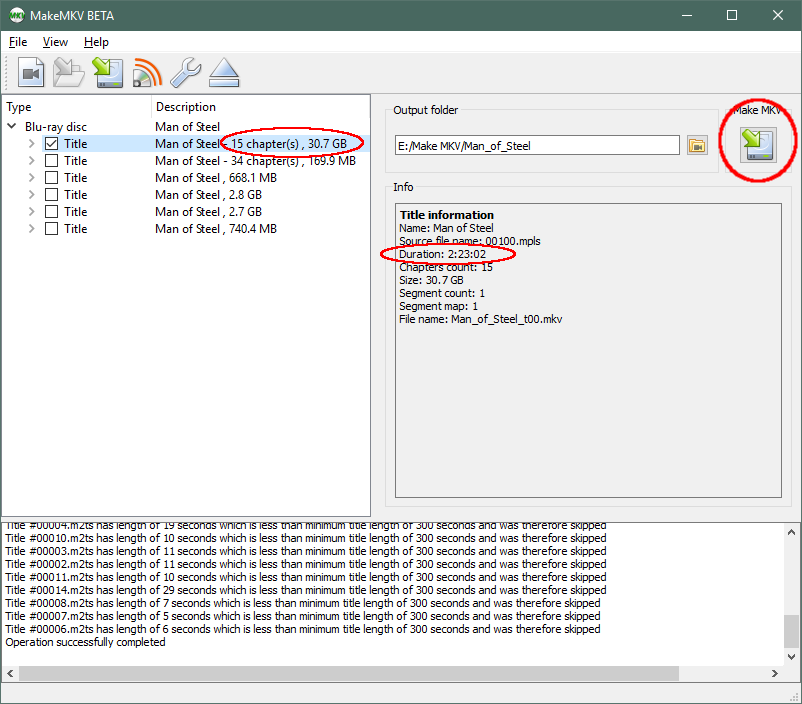
Insert your movie disc and open up Make MKV. It will scan the drive and show you which movie has been inserted. If you have multiple drives you may need to select the correct drive from the Source drop down. Open the disc by clicking the giant drive icon below the disc information.

MakeMKV will begin searching for titles on the disc. Depending on what kind of protections the disc uses this may be quick or make take a long time. Once it's complete you'll see a list of possible titles with checkboxes next to each one. You will need to identify the correct title for the movie and select only that title. To de-select everything right-click any title and select Unselect All.
Usually you can identify the proper title by looking at the overall size and duration. Some discs however will generate a lot of fake titles with the same size and duration but with the movie pieces put into a random order. If you have trouble finding the proper title try searching the internet for information on the correct one. If all else fails, you'll just have to copy all possible titles then review them later.
Once you've selected the titles you want to copy click the Make MKV button to start the copy process. This will take some time to complete, especially if you've selected multiple titles.
Once the copy is complete, you can move on to encoding the movie.
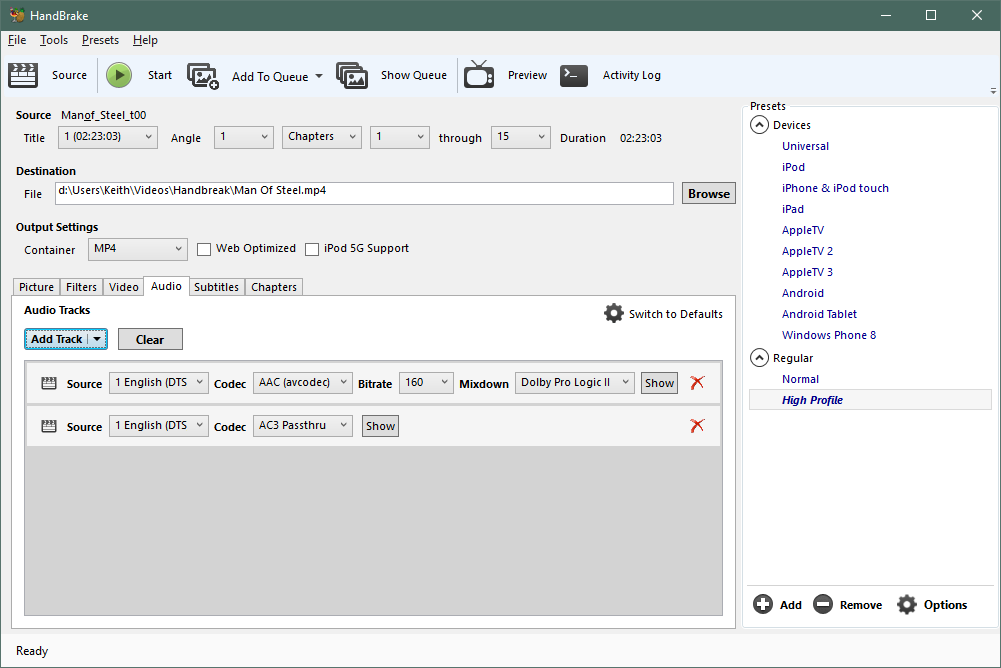
Encoding the movie
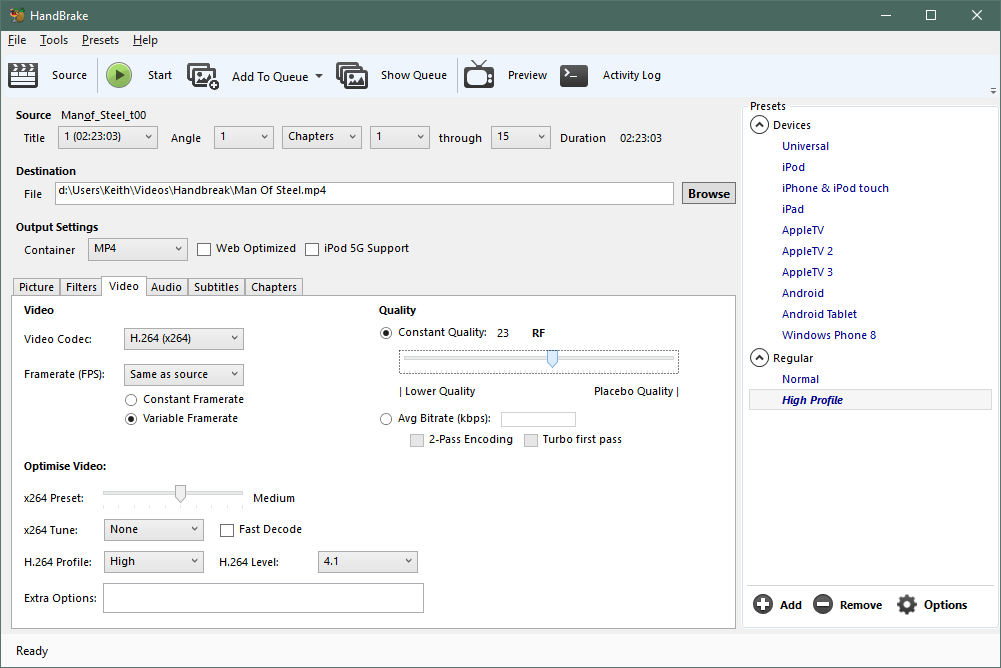
Open Handbrake and select the MKV file you want to encode by clicking Source in the toolbar then selecting File from the menu that opens. Browse to the MKV file and select it. Handbrake will do a quick scan of the movie to gather some information then fill in a lot of the details for you automatically.
If you're wanting to put the movie onto a particular device, check the preset values on the right to see if your device is listed and if so select that preset. Otherwise, for general computer viewing I select the High Profile preset.
On the Video tab, you may want to change the Quality slider. The default value of 20 is good for a DVD movie. For a Blu-ray you may want to increase it to 23. This slider determines how much Handbrake will attempt to compress the video file. Higher numbers mean more compression which results in smaller file sizes. Higher compression comes at the cost of image quality however, so you do not want to go to extreme.
On the Audio tab make sure that the audio tracks for your language have been added. If they are missing, or you'd like to add additional languages then click the Add Track button. A new row will be added to the list and from there you can select which language track you want and what codec type should be used.
If your movie has foreign language parts which requires subtitles then go to the Subtitle tab. Click Add Track and select the Foreign audio scan option. Handbrake will automatically scan for subtitles for the necessary subtitles and encode them into the video. This feature has worked pretty will in my cases, but you will want to check the encoded movie after it finishes just to verify they were found and added correctly.
If handbrake does not successfully add the subtitles when using the foreign audio scan feature then you'll have to re-do the movie but selecting a specific subtitle track instead. If you don't want to have subtitles for the entire movie you can try enabling the Forced only option. This will limit the shown subtitles to only those that were marked as forced on in the original disc which is typical for foreign language bits.
