How to compile avconv on Windows
A quick guide on how to compile avconv on Windows 10 x64 with everything that you will need to create .mp4 and .webm videos for the web. Inspired by my need to re-encode the Tales of the Past series into these formats and the fun of trying compiling things.
Note: If you just want a binary that will work you can download the pre-compiled GPL version from the libav website. The GPL version is necessary for mp4/x264 encoding, the LGPL version does not come with this encoder.
What you'll need
Setup your environment
I like to use a VirtualBox VM when trying to compile various projects. It keeps my main system clean and thanks to the snapshot feature lets me easily revert back to a known state if I get things too messed up. I have a VM pre-configured with MSYS2 that I clone whenever I decide to try and compile something.
Download and install MSYS2, but do not try and go through the updating steps listed on their home page just yet. As of writing this their update instructions are incorrect. There are a couple of missing steps that you need to do in order for the update to apply properly.
After the installer completes open the MSYS2 shell then run the command:
update-core
After the core has been updated, close the MSYS2 shell with the red X (or alt+f4) and then re-launch it. Update the pacman package manager with the command:
pacman -Syu pacman
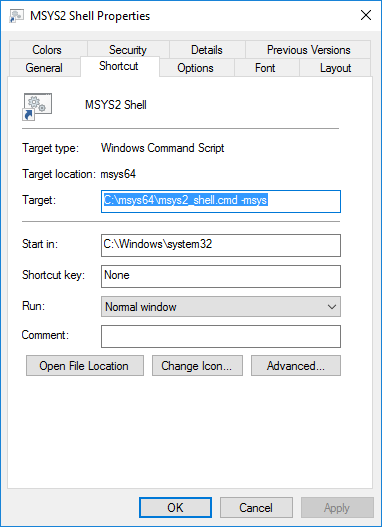
After pacman has been updated you will need to update the shortcuts the installer created as the shell startup scripts have changed. The new command lines are:
- MinGW Win32 Shell should target
C:\msys64\msys2_shell.cmd -mingw32 - MinGW Win64 Shell should target
C:\msys64\msys2_shell.cmd -mingw64 - MSYS2 Shell should target
C:\msys64\msys2_shell.cmd -msys
For each of those shortcuts open their properties and change the target field to the corrected value.
After you've updated the shortcut targets, close the MSYS shell again and re-launch it once more. Update the rest of the system using the command:
pacman -Su
Finally following commands to install required packages.
pacman -S make pkg-config diffutils
pacman -S mingw-w64-x86_64-yasm mingw-w64-x86_64-gcc mingw-w64-x86_64-perl
Sources
Download the source distributions for both x264 and libav. Extract the source files into C:\Sources. These will be accessible from within the MinGW shell at /c/Sources.
As of writing this libav's most recent release (11.x) will not work with the current version of libvpx. You must instead download their latest snapshot bundle. Search for libav-snapshot.tar.bz2 in the releases directory.
Compile everything
Open a MinGW Win64 Shell and navigate to the sources directory. You'll be doing all your compiling through this shell so keep it open.
x264
Navigate into the x264 source directory. Run the following command to configure the build process.
./configure --prefix=/c/Compiled --enable-shared --disable-cli
Once the configuration is complete, build the project using the make command then install the binaries and headers with the make install command.
Libav expects this library to be in a file named x264.lib which is not what is generated by the install command. Rename the installed library to the expected name with this command:
mv /c/Compiled/lib/libx264.dll.a /c/Compiled/lib/x264.lib
libvpx
Navigate into the libvpx source directory. Run the following command to configure the build process.
./configure --prefix=/c/Compiled --enable-vp8 --enable-vp9 --disable-docs --disable-examples --disable-unit-tests
Once the configuration is complete, build the project using the make command then install the binaries and headers with the make install command.
libogg
Navigate into the libogg source directory. Run the following command to configure the build process.
./configure --enable-shared --disable-static --prefix=/c/Compiled
Once the configuration is complete, build the project using the make command then install the binaries and headers with the make install command.
libvorbis
Navigate into the libogg source directory. Run the following command to configure the build process.
./configure --prefix=/c/Compiled --enable-shared --disable-static --disable-docs --disable-examples --disable-oggtest --target=x86_64-w64-mingw64
Once the configuration is complete, build the project using the make command then install the binaries and headers with the make install command.
libav
Open a MinGW Win64 Shell and navigate to where the libav sources reside.
Because we used a custom prefix when installing x264 and libvpx, we need to modify the PKG_CONFIG_PATH environment variable to include the directory where their pkgconfig files are located. To do that use this command:
export PKG_CONFIG_PATH=$PKG_CONFIG_PATH:/c/Compiled/lib/pkgconfig
Now use the following command to configure the build process.
./configure --prefix=/c/Compiled --extra-cflags='-I/c/Compiled/include' --extra-ldflags='-L/c/Compiled/lib' --enable-gpl --enable-libx264 --enable-libvpx --enable-libvorbis --disable-avplay --disable-debug --disable-doc
Once the configuration is complete, build the project using the make command then install the binaries with the make install command.
Along with the binaries installed during the above process you may need to copy over some additional mingw dll files for the program to function properly. In my case I required the files libbz2-1.dll, libwinpthread-1.dll, and zlib1.dll. Copy these files over using the following command:
cp /mingw64/bin/{libbz2-1.dll,libwinpthread-1.dll,zlib1.dll} /c/Compiled/bin
That's it, you're done! Now you can copy the binaries from C:\Compiled\bin to wherever you need them and start using avconv to encode your videos.